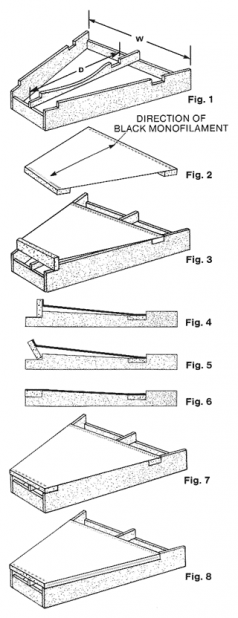
For simple, quick installation of Dymetrol® into wedges.
Step 1
Modify side rails and stretch rails as shown in Figure 1 to accomodate the frontand rear rails.
Step 2
Attach Dymetrol® to front and rear rails – Figure 2.
Size of Dymetrol® is determined as follows:
- Measure distance “D” (Monofilament Length).
- Multiply “D” x 0.95 = width of Dymetrol®. (Allows for 5% stretch)
- Measure and cut width (W) to allow 1-2″ overlap on sides of wedge.
NOTE: Prior to installation, break all sharp edges where the Dymetrol® will come into contact with the frame. Use recommended staple and staple pattern. Refer to Bulletin No. 1 (H-04610)
Step 3
Place rear rail into notches in the stretch rails and fasten in place (screw or frame staples) – Figure 3.
Step 4
Stand front rail vertically in notch – Figures 3 and 4.
Step 5
Use hand tool to rotate front rail through 90o and fasten into place – Figures 5-7.
Step 6
Pull Dymetrol® snug (by hand) over sides and staple into place – Figure 8.
